Creating images in pages

_(2).jpg)
To include images in pages is a two steps process.
First we need to create the images, and later, we associate them with the page.

We click on 'Images in Pages' and select 'Add Image'.

Here we need to upload the new image. The website and name are only as a reference, to later be able to find the image easier. Please fill all the fields and click on 'Submit'.

After storing the image, you will get back to the list of images with a success message. There you can copy the route of the uploaded image, highlighted. Usually starting with ...

If you miss this chance, you can always copy the path editing the uploaded image, as is remarked on top of the details of the image.

Once this is done, we can just go to Edit pages. We select the page we want to modify and in the Description field, we can insert any of the images. To do so, we select the area of the page where we want to include the image and then click on the image icon.

Once this is done, we just copy the previously generated path in 'Image URL'. It is recommended to fill the others fields with the name of the image, for SEO purposes.

We get back to the CMS editor and here it is just a matter of storing the page. Please consider if we do this last step super fast the image can be missing, as is sent in the background.
We can check everything is well done clicking on 'Edit again' and on 'View page' to see the live version of the page.
Once you are familiarazed with the process, it is easy to include several images very fast, but at the beginning it is a good practice to do the full process to ensure everything works as expected.
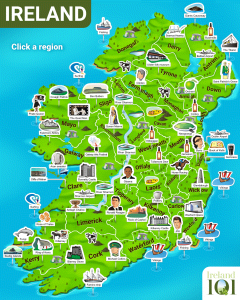
Cultural Map of Ireland